
Friday, March 14, 2008
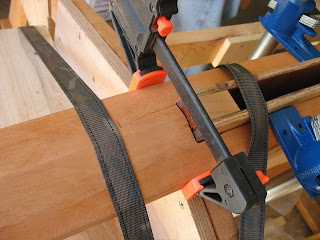
Chine and Sheer - Installed
More details will follow soon, but here are a couple pictures of the chine and sheer - glued and screwed.


Sunday, March 9, 2008
Sharp
Early on in cooking school (or perhaps even before), I was told and came to accept as fact that a sharp knife is a safe knife. This ran counter to my thinking, but the least bit of work with a dull knife makes the point with conviction. (Try peeling a butternut squash with a dull chef's knife if you don't believe me.) The same, I've found, is true with shop tools.
As mentioned previously, I had never bothered to sharpen a chisel (or plane iron) until about 6 weeks ago. It never occurred to me that my three chisel set (~$10 retail value) wouldn't be ready for high-level woodworking action the moment I cracked the plastic packaging. I could see this being the case in Canada. But in America, land of the pickup truck? Please.
Needless to say, you can imagine my surprise after sharpening my first chisel (one of those cheap Harbor Freight chisels) and testing it out on a piece of scrap. It was unbelievable! I was making transparent shavings no thicker than a piece of paper! I finally felt like I knew what I was doing with a chisel. It also explained why I was never able to do any sort of fine work with chisels before. Clearly I had never used a truly sharp chisel, and did it ever made a difference. It transforms the task from one of frustration and failure to one of productivity and enjoyment. With sharp tools, I'm starting to understand how woodworking can be a craft or an art.
My setup consists of a Veritas Mk.II honing guide (I can't overemphasize how great this is), three pieces of ~ 4" x 9" polished marble that Mikey gave me (they were broken, unusable pieces from a job site, I think), and two wetstones (a 1200 grit and a combo 4000/8000 grit). Adhered to the three marble pieces are sheets of sandpaper - 100 grit (or lower if needed), 220 and 320. I've basically mimicked the setup described in the Fine Woodworking online video mentioned in the previous post. It's great, and I highly recommend it.
Friday, March 7, 2008
Shopping spree
After installing the keel, I had a break of a couple months while I waited for the time and money needed for the chine and sheer. There wasn't much boat work in November and December, but we finally took delivery of a bunch of wood right before Christmas. In the meantime, there were tools to buy. One day when Jen was out of town, I went on a shopping spree at Woodcraft. It was awesome. Here's what I picked up:
Lie-Nielsen Low Angle Smooth Plane (L-N 164)
Veritas Mk.II Honing Guide
Waterstones - a 1200 and a 4000/8000 combo
Chisel set
8" Microplane (coarse)
The honing guide and waterstones were part of my sharp chisel initiative, which will be discussed more completely in an upcoming post. The Microplane replaces/augments a basic wood rasp that I've had for some time. The wood rasp works OK, but this Microplane is great. I had used them in the kitchen before, but never in the woodshop; they're great in both places. The chisels augment a cheap set that I'd bought several years ago at Home Depot or Lowes or Harbor Freight - a cheap set that I never bothered to sharpen and which, consequently, never worked well. (In truth, I didn't know you were supposed to sharpen your chisels before you use them. I figured you just opened the package and put them to use. I suppose if I bought really nice chisels, they'd be ready to use out of the box. Not those.) The plane was obviously the big purchase among these things, and I haven't used it yet. Big Shot Bob is coming over soon to help me figure out how to use it and, hopefully, how to do some of the upcoming fairing work, regardless of the tools used.
Wednesday, March 5, 2008
Boat work since the last blog
So I'll try to get things up to date since the last boatbuilding post. After Mike and I steamed the keel and clamped it in place, I let it dry for a week or two, largely because I didn't have time to get to it. In mid-October, Vince came over and helped me epoxy it in place, and I added some screws about a week after that. It is at this point that I should mention one of the major headaches of boatbuilding, at least with this project.
Whenever you epoxy something, you have to hold the surfaces together until the epoxy cures. For much of this project, that "holding together" is done with clamps. In order to keep the clamps from being epoxied to the boat themselves, they have to be separated from the wood (or other material). I accomplish this with wax paper, which is great for that purpose - it's cheap, it's available in any size you care for, it's quick, and it keeps out the epoxy. Of course, it's also slippery, and this is where the trouble comes in. It's just about impossible to use a clamp in conjunction with wax paper, on account of the paper's slipperiness and the ease with which it will compromise any fleeting purchase you might obtain. And of course, while you're struggling with the clamps and the wax paper, there's glue all over the place, and if it's hot enough outside, the glue is curing and you're basically in freak-out mode. So the four-letter words flow like water, and you end up just fighting and fighting until you get things to the point where you can walk away and feel reasonably certain that as long as you don't sneeze, everything will hold. It's not quite that bad, but I'm not really exaggerating.
I mentioned in a previous post that there was a small crack along the keel, just past the forward end of the centerboard slot. It turns out there's an accompanying small crack just past the aft end of the slot as well. Here is a picture of the forward crack:
The actual size of that crack is about 1.5", and the aft crack is smaller than that. I treated both cracks with some epoxy, but to make sure nothing bad will happen, I placed a 4" x 4" plate of 1/4" plywood underneath the area of each crack, to act as a support against the crack expanding. I don't think anything would have happened without the plywood backers, but with them now in place, I feel very confident that nothing heinous will come of them.
Whenever you epoxy something, you have to hold the surfaces together until the epoxy cures. For much of this project, that "holding together" is done with clamps. In order to keep the clamps from being epoxied to the boat themselves, they have to be separated from the wood (or other material). I accomplish this with wax paper, which is great for that purpose - it's cheap, it's available in any size you care for, it's quick, and it keeps out the epoxy. Of course, it's also slippery, and this is where the trouble comes in. It's just about impossible to use a clamp in conjunction with wax paper, on account of the paper's slipperiness and the ease with which it will compromise any fleeting purchase you might obtain. And of course, while you're struggling with the clamps and the wax paper, there's glue all over the place, and if it's hot enough outside, the glue is curing and you're basically in freak-out mode. So the four-letter words flow like water, and you end up just fighting and fighting until you get things to the point where you can walk away and feel reasonably certain that as long as you don't sneeze, everything will hold. It's not quite that bad, but I'm not really exaggerating.
I mentioned in a previous post that there was a small crack along the keel, just past the forward end of the centerboard slot. It turns out there's an accompanying small crack just past the aft end of the slot as well. Here is a picture of the forward crack:

The actual size of that crack is about 1.5", and the aft crack is smaller than that. I treated both cracks with some epoxy, but to make sure nothing bad will happen, I placed a 4" x 4" plate of 1/4" plywood underneath the area of each crack, to act as a support against the crack expanding. I don't think anything would have happened without the plywood backers, but with them now in place, I feel very confident that nothing heinous will come of them.
Tuesday, March 4, 2008
Update
Hey there, I have clearly been lax in my postings (5 months lax - ugh!). Boat business has been picking up lately, so I hope to begin fresh and keep this document more up-to-date. There are a few separate posts I'll make in the very near future to cover the past several months of work. Although the boat doesn't look all that different, plenty of progress has been made.
My goal is to have this boat in the water by July 4th. This is a very very aggressive goal, considering the state the boat is in today, but it's not outside the realm of possibility. We'll see what happens, though I would really like to meet that goal.
My goal is to have this boat in the water by July 4th. This is a very very aggressive goal, considering the state the boat is in today, but it's not outside the realm of possibility. We'll see what happens, though I would really like to meet that goal.
Subscribe to:
Posts (Atom)